Save Powerpoint For Mac As Video
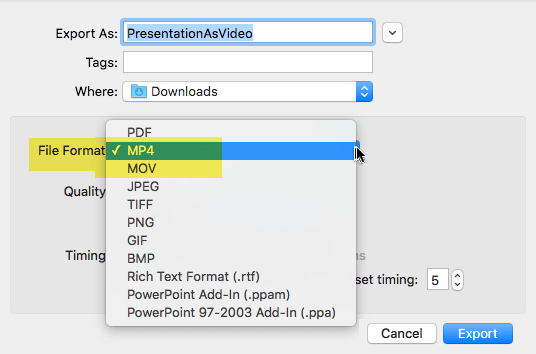
Note: This feature is only available to. If you have an Office 365 subscription,. (Beginning with PowerPoint for Office 365 for Mac version 16.19, audio narration is included in the video when you export your presentation.) • Click File > Export. • On the File Format menu, select the video format that you want (MP4 or MOV). • Select the video quality you want: Presentation Quality, Internet Quality, or Low Quality. The higher the video quality, the larger the file size. • If you have recorded timings and want to use them in the video you create from your presentation, make sure the box next to Use Recorded Timings and Narrations is checked.
You can also choose to set the amount of time the video will spend on each slide if you don't have a set timing. • When you've made all your selections, choose Export. Note: When you export your presentation as a video, any narrated audio that was recorded in Slide Show will play, but other embedded media files won't play. After you've saved your presentation as a video, you can share it just as you would any other video, by using applications or devices that can open and play videos. Export your slides as pictures You can save one or more slides as pictures so that the recipient can view the slides in any application or device that works with pictures. Just make sure that you choose a picture format that the application or device can open.
Note: When your slides are converted to picture files, any transitions, animations, movies, or audio are removed from the presentation. • Click File > Export. • On the File Format menu, select the picture format that you want, such as JPEG or PNG. • Select either Save Every Slide or Save Current Slide Only. You may also enter a size for your slide images in the Width and Height boxes. If you choose to save every slide, your presentation will be saved as individual image files, one for each slide. After you save your slides as pictures, you can share them just as you would any other picture file, by using applications or devices that can open pictures.
Export your presentation to PDF format • Click File > Export. • On the File Format menu, click, PDF. After you save your slides as a PDF file, you can share them just as you would any other PDF file, by using applications or devices that can open PDF files. Tip: To set additional options such as image height and width, or choose to save only the current slide instead of all slides, click Options, and then under Save slides as graphic files, choose the options that you want. • Click Save.
For iOS & Android. Meet Movavi PowerPoint to Video Converter – the perfect software for transforming PowerPoint presentations into video files. Turbografx cd emulator mac. With this program, you can easily convert a slideshow to MP4, AVI, WMV, MOV, or any other popular video format. Save PowerPoint as a video file and watch your presentation.
Where is my account information for clean my mac. However - and this is my view only - the best thing you can do to 'clean up your mac' and by implication 'service it' is to back up everything of importance and reformat and reinstall. That includes any 3rd-Party applications.
After you save your slides as pictures, you can share them just as you would any other picture file, by using applications or devices that can open pictures. Send your slides to iPhoto Sending your slides to iPhoto is similar to exporting your slides as pictures, with the added advantage of being able to easily transfer the pictures to any device or application that connects to iTunes. When you send your slides to iPhoto, each slide is converted to a picture. This removes any transitions, animations, or audio and causes movies to be represented as a single frame in the presentation. Note: To complete this procedure, you must have iPhoto 6 or a later version installed. • On the File menu, point to Share, and then click Send to iPhoto. • In the New Album Name box, type a name for your collection of photos.