Format Wd My Passport For Mac Sierra
• This answer explains how to format a drive in the exFAT or FAT32 file system. This allows the drive to be used on both Windows and macOS. • This answer explains how to format a WD drive for use on Windows and macOS. • This answer explains how to erase a WD drive in Windows OS and macOS. • This answer explains how to setup and use WD Security and WD Drive Utilities on a Windows or Mac computer. • This answer explains how to install WD Apps software in Windows (10, 8, 7, or Vista) and macOS (10.8.x Mountain Lion through 10.12.x Sierra). • WD Discovery Online User Guide.
How to install/use Wester Digital my Passport for mac and pc windows, Western Digital 100gb 200gb 300gb 400gb 500gb 1tb, 2tb, 3tb, 4tb, 5tb, 6tb 7tb 8tb 9b 1. Skip navigation Sign in.
• This answer explain starting macOS Time Machine backups to My Passport and External USB Drives. • Direct Attached Storage Online User Guide and Solutions • This article explains how to safely eject a USB device from a computer. This answer explains how to format a drive in the exFAT or FAT32 file system. This allows the drive to be used on both Windows and macOS. This answer explains how to format a WD drive for use on Windows and macOS. This answer explains how to erase a WD drive in Windows OS and macOS. This answer explains why My Cloud mobile app is unable to access the 'TimeMachineBackup' or 'SmartWare' shares on a My Cloud device. This answer explains how to fix WD Software install, uninstall and update issues on Windows PC. This article explains how to backup and restore using the File History feature of Windows 10. WD Community It's taken a fall or two to the soft carpet floor from a height of about 16 inches, but I don't think this should be a problem. I'm sorry, but those 16 inches are more than enough to damage a drive. The drive is probably physically damaged.
It doesn't take much of a bump to damage them. Professional data recovery is likely the only solution.
Joe Well, yeah. Dropping the drive on the floor even from 12-16 inches will break it. Sorry, but if you need the data, you're looking at data recovery, and that's if they can help you. Dropping included, you have several kinds of issues that arise that can cause a drive not to read. The drive itself is broken, which means you can only possibly retrieve your data through data reco.
So, you just bought an external hard drive and wanted to use it on your Mac. But somehow, macOS doesn’t allow you to write data to the drive. That’s all because it’s been initialized with Windows NT File System (NTFS), which is primarily for PCs. Apple Mac machines support a different file system. In this post, I’m going to show you how to format your external drive for a Mac compatible file system i.e. Mac OS Extended (Journaled). Just follow this easy step-by-step guide and you’re all set.
Important note: If you have useful files stored on the external drive, be sure to copy or transfer them to another safe place prior to formatting. The operation will erase all data and your files will be gone for good. You could use a recovery program like to retrieve them, but the odds of recovery vary. Pro tip: If your external drive has a large volume, like mine – a. I highly recommend you also create multiple partitions. I’ll also show you how to do that below. Most External Hard Drives Are Initiated with NTFS During the last several years, I’ve used several removable drives, including a 500GB WD My Passport, 32GB Lexar flash drive, and a few others.
Ntfs for mac os free download. Three weeks ago, I bought a brand new 2TB Seagate Expansion to backup my MacBook Pro before I updated to the latest macOS, 10.13 High Sierra (also see those I encountered). When I connected the Seagate to my Mac, the drive icon showed up like this.
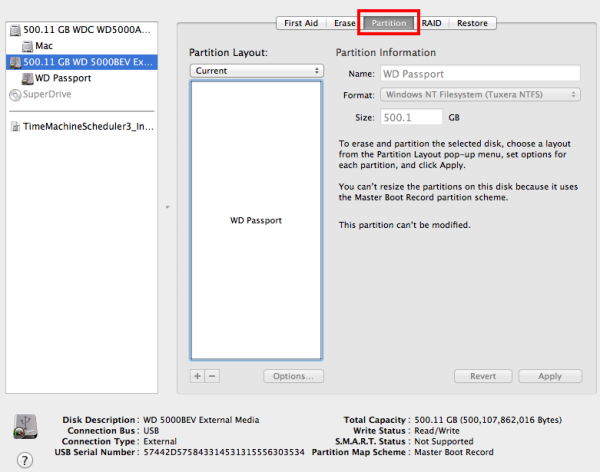
When I opened it, the default content was all there. Since I wanted to use it on Mac, I clicked the blue logo with the text “Start_Here-Mac”. It brought me to a webpage on Seagate’s site, where it clearly indicated the drive was initially set up to work with a Windows PC. If I wanted to use it with Mac OS or Time Machine backup (which is my intent), I’ll need to format the drive for my Mac. I then right-clicked the external drive icon on Mac desktop > Get Info. It showed this format: Format: Windows NT File System (NTFS) What is NTFS? I’m not going to explain here; you can read more on.
Latest popcorn time for mac. Introduction: Popcorn Time apk| Popcorn Time app for iOS, Mac, iPhone, PC download links are right here. Get Popcorn time apk and watch unlimited movies and TV shows. Get Popcorn time apk and watch unlimited movies and TV shows.
The problem is that on macOS, you can’t work with files saved on an NTFS drive unless you use a paid app. How to Format an External Drive to Work with Mac (from NTFS to Mac OS Extended)? Note: The tutorial and screenshots below are based on macOS Sierra 10.12.5. They might be different if your Mac has a different version. Step 1: Open Disk Utility. The quickest way to do this is a simple Spotlight search (click the search icon on the upper right corner), or go to Applications > Utilities > Disk Utility.