Data Backup 3 For Mac Sierra Os X
Then let’s go! Java uninstall tool for mac. Delete apps using the Trash Whether you're running macOS Mojave or an earlier OS X, like El Capitan or Yosemite, the process of manually uninstalling remains relatively similar. Even uninstalling apps on macOS Mojave requires getting rid of leftovers, despite the fact that it's the latest and the most sophisticated system for Mac. Apple has done such a good job on macOS 10.14 but left this unfortunate issue unresolved for another year.
The remaining steps vary considerably depending on the operating system you are running. Choose About This Mac from the Apple menu to determine your current OS, then make a selection below. • • • Instructions for High Sierra and later Show All Devices Disk Utility in High Sierra offers a very simplified view of your devices by default. Unfortunately, this hides the devices that you need to select to modify the partitioning of your backup disk. Before doing anything else in Disk Utility, choose Show All Devices from the View menu, or from the View popup button in Disk Utility's toolbar. Select the backup disk Click to select the disk that you would like to use for your backup.

> How to > Mac File Recovery > Update & Install macOS Sierra without Losing Data. Update & Install macOS Sierra without Losing Data. Then you can follow below tips to prepare your Mac OS ready for macOS Sierra update. Backup all your personal data and even create backups for your present Mac data through Time Machine. Disk Drill: The best data recovery software for Mac OS X. Recover deleted. Do you need to recover deleted files in Mac OS X, such as critical business documents, music, photos or videos? Disk Drill 3 can recover your lost Android data.
This disk should not be the same as your startup disk. The name of a new disk will often include the manufacturer’s name (e.g. WD My Book 111D Media.). A startup disk will often include the manufacturer's serial number in the title (e.g. TOSHIBA MK50.).
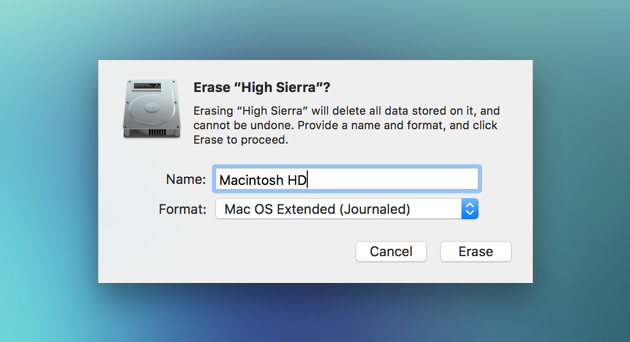
Erase the backup disk Click on the Erase button in Disk Utility's toolbar, then configure the name, format, and partitioning scheme of your backup disk. You can set the name to whatever you like, but set the Scheme to GUID Partition Map. Choosing a Format for your destination volume Starting in macOS High Sierra, both APFS and Mac OS Extended (Journaled) are acceptable formats for a backup of macOS 10.13 (and later)., we recommend that you choose APFS if your destination device is a Flash storage-based device (e.g. An SSD) and will be used to back up 10.13 or higher, or if you are backing up a T2-based Mac and you intend to enable encryption on the backup.
Choose Mac OS Extended (Journaled) if your destination device is a spinning-platter-based device (i.e. A hard disk drive, or HDD), or if you are backing up an operating system older than 10.13.
When you erase an APFS-formatted startup disk, erase the whole device If you're erasing an APFS-formatted volume that has (or had) an installation of macOS, it's important to erase the whole container of the volume, not just the volume that you can see. When you use APFS for an installation of macOS, the container will have additional hidden partitions that retain information specific to the previous OS (indicated by the red rectangle on the right in the screenshot below). To remove all of those remnants, select and erase the whole device ('Apple SSD' in the screenshot below) – Disk Utility can't erase the container alone, so erase the whole device. Click the Erase button when you are finished configuring the name, format, and partition scheme for your destination. Your new hard drive is now ready to accept backups created by Carbon Copy Cloner!