How To Setup A Partition For Osx
Creating a Separate Data Partition During Installation OS X 10.5 and later • Open Disk Utility during installation. • Select the hard drive you would like to partition and choose 'Partition' in the main pane. • Under 'Volume Scheme,' select the number of partitions you would like. Generally 2 will be sufficient. Linux vs mac for steam.
Jan 24, 2018 - You can set the name to whatever you like, but set the Format to Mac OS Extended (Journaled) and set the Scheme to GUID Partition Map, then. Oct 16, 2018 - How to partition a Mac hard drive or SSD, or create a APFS volume. This is thanks to the new Apple File System (APFS) which replaced the.
• Select each partition and set a name for the volume and the format. For the operating system partition, it needs to be Mac OSX Extended (Journal).
For your data partition, you can choose Mac OSX Extended (No Journaling) • Change the size of the partitions by dragging the bar which divides them. • Select the proper partition and install OSX. Creating a Separate Data Partition In an Existing Copy of OS X • Navigate to Go > Utilities > Disk Utility.
• Select the hard drive you would like to partition. • Click 'Partition' in the main pane. • Select the '+' under the visual depiction of the drive. A new space for the partition will appear. • Drag the bar separating the two partitions until the new partition is the size you would like it to be. • Give it a name and choose a format if necessary. • Apply changes.
Your main partition will be unchanged and merely resized and you will not lose personal data.
Mac OS X Installation Basics SATA Drive If the SATA drive will simply be a storage drive, please see the 3rd section of this article - Installing a SATA Drive as a Storage Unit. Installing a SATA Drive as a Boot drive 10.11 Note: Reformatting the drive will erase all data on the drive, so you should copy any data you want off the drive prior to formatting. • Physically install the drive into the Mac.
• Insert the Mac OS X install CD or USB drive. • Power on the computer while holding down the option key. • Select Installer. • Select Disk Utility. • Highlight the drive. • Select Erase. • Enter Volume information (Name, Format, and Scheme).
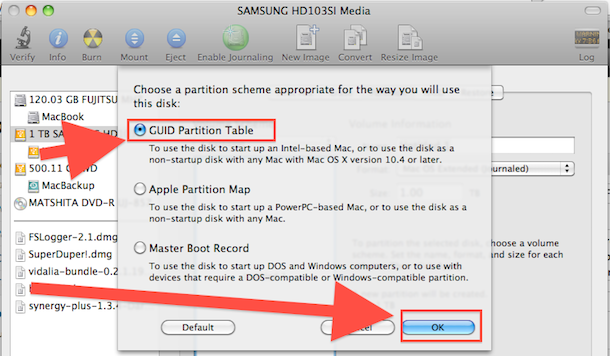
• Select Mac OS Extended (Journaled) for Format. • Select GUID for Scheme. • Select Erase. (Note: This will erase all data from the drive.) • Click on Disk Utility and select Quit Disk Utility. • Select Install OS X from the options • Select your drives as the destination and install Installing a SATA Drive as a Boot drive 10.6 to 10.10 Note: Reformatting the drive will erase all data on the drive, so you should copy any data you want off the drive prior to formatting. • Physically install the drive into the Mac. • Insert the Mac OS X install CD or USB drive.
Video format for youtube. • Power on the computer while holding down the option key. • Select Installer. • Select Disk Utility.
• Highlight the drive. • Select Partition. • Select 1 Partition • Name the drive • Choose Mac OS Extended (Journaled) Partition for the volume format. • Click Options - Select GUID • Select OK • Select Apply (Note: This will erase all data from the drive.) • Select partition • Click on Disk Utility and select Quit Disk Utility.
• Select Install OS X from the options • Select your drives as the destination and install Installing a SATA Drive as a Storage Unit - 10.11 • Physically install the drive into the Mac. • Turn the Mac on • Select Applications. • Select Utilities. • Select Disk Utility. • Select the Erase tab. • Verify that the correct hard drive is selected in the left column. • Enter Volume information (Name, Format, and Scheme).
• Select Mac OS Extended (Journaled) for Format. • Select GUID for Scheme.
• Select Erase. (Note: This will erase all data from the drive.) Installing a SATA Drive as a Storage Unit - 10.6 to 10.10 Note: Reformatting the drive will erase all data on the drive, so you should copy any data you want off the drive prior to formatting. • Physically install the drive into the Mac.